 This has been a large topic of debate over the past few seasons in the snowboarding world and everyone seems to have a differing opinion on which is better. This article will shed some light on the benefits of each for you and your students and help you decide which type of board is going to fit best for your riding style. I will be sharing with you what I’ve learned and experienced over the past 12 years of coaching snowboarding and give you some insight on how I help my students choose the right gear.
Ideally we would all have a different set up for each type of condition we’re riding. Unfortunately that’s just not financially feasible for most of us so we need to narrow it down to our personal riding style and how we want our board to feel.

We will be exploring three different board shapes in this article, only looking at the most common of board designs that are in the market right now. These shapes are camber, reverse camber, and rocker with dual camber. The easiest way to think of these is that camber looks like a sad face, reverse camber (or rocker) looks like a happy face, and the rocker/camber combo looks like a mustache, each one having its own set of benefits and limitations.
Let’s start with the benefits and limitations of traditional camber
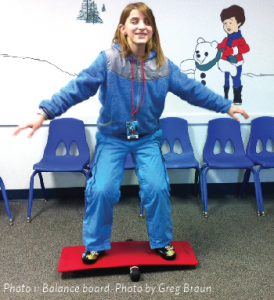
This is our tried and true technology. When you step onto this style of board you generally feel pretty stable. This is because your contact points are at the nose and tail of the board and it gives you a larger platform to stand on. Think of it like standing on a balance board (photo 1). If your feet are close together it can be very hard to stay balanced, but when you move your stance wider you feel much more stable. It’s very easy to load the nose or tail of the board without losing balance, sometimes making it easy to move too far forward or backwards and losing a centered and balanced stance.
![]() If you’re into boardercross, banked slalom or GS this is probably the right board shape for you. Other than being more stable there are some other great benefits to camber, and also some downsides. On the icy hard pack days the average rider may find using a cambered board can be more effective. That extra stability can help give you the edge you need to keep from sliding out and falling. This is because of a reduced ability to pivot the board underneath of you, which might not be ideal when riding the steeps on a “pow” day or trying to perform maneuvers in the terrain park. The ability to pivot the board can be an essential step to a new student’s success in learning their first skidded turns.
If you’re into boardercross, banked slalom or GS this is probably the right board shape for you. Other than being more stable there are some other great benefits to camber, and also some downsides. On the icy hard pack days the average rider may find using a cambered board can be more effective. That extra stability can help give you the edge you need to keep from sliding out and falling. This is because of a reduced ability to pivot the board underneath of you, which might not be ideal when riding the steeps on a “pow” day or trying to perform maneuvers in the terrain park. The ability to pivot the board can be an essential step to a new student’s success in learning their first skidded turns.
Because of the shape of these boards the nose is going to constantly want to dive down into the snow forcing you to need a bigger board to ride some of our heavier Northwest “pow” days. When forced to ride a board that is too big we tend to lose some of our ability to move. When riding steep tree lines I always want to have confidence that I’m able to move in and out of every situation.
Now let’s move on to reverse camber commonly referred to as rocker.
While it’s not necessarily new technology it has certainly made a giant comeback over the past few years. This is probably the least stable board design out there but it can also have some tremendous benefits in certain situations. I would not recommend this board shape for icy hard pack conditions, but when there’s two to three feet of fresh snow this is among the best board shapes you could be riding and could be even more beneficial for kids.
Have you ever taken out a ten year old on a deep snow day only to find that you have to throw them over your shoulder and carry them down the hill because it’s just too deep? Well this board shape allows even kids to get out and have fun on those days. The nose of the board wants to shoot up and out of the snow making it ideal for these conditions. Not to mention the added ability to easily pivot the board and make fore/aft movements, giving the average snowboarder a better riding experience when the snow is deep.![]()
On that same subject, children don’t have the fully developed muscles that an adult does, making it very difficult for them to make some of the essential movements on a traditional cambered board. When we put them on a “rocker” snowboard, we’ve made it much easier for them to experience some of the movements that are key to good snowboarding; specifically those fore/aft and pivoting movements which are essential to riding steeps, bumps, park and halfpipe. This design can more easily allow a child to blend movements as it has a much looser feel on the snow and doesn’t feel like it’s glued to the ground below you. The earlier we can get a snowboarder to learn and experience good movements in riding, the more successful they are going to be in the long run.
Last but not least, the camber rocker combo boards.
While there are many versions out there I’m going to focus on just one of them for this part of the article. This is the camber rocker, aka; dual camber, C2, mustache shape. These boards are reverse camber dominant but have camber underneath each foot. This one is my personal favorites, giving me that loose, pivot feeling of the rocker board, yet is still quite stable, much like the traditional cambered boards. This is my “anywhere – anytime board” – it is the most versatile of all the options, although it can still be a bit unstable when conditions are icy because of the centered point of contact. Being a very versatile board containing the benefits of camber and rocker, this board shape handles itself well in powder, steeps, park and groomers. ![]()
One of the greatest benefits of this design I’ve found personally, and for my students, is that it forces the rider to stay more centered in their stance. Too much movement fore/aft and you’re likely to lose your balance and nose dive or fall backwards. Students are going to have an increased likelihood of discovering how much they should move when there is less room for error. Given that, I would never suggest putting your students in a situation where they are likely to fall and get hurt. Make sure the equipment you choose is right for them.
Conclusion
While there are many different board shapes out there beyond what are in this article, it is up to you as a coach to figure out which one is right for your individual students. Hopefully the short descriptions in the article will give you a general framework for each of these board designs to help guide you in the right direction. I would strongly suggest trading boards with friends at the hill or checking out one of your local demo days and testing out some of the options so that you as an instructor can get a feel for each of these designs and be able to give a good recommendation to your students.
And remember that just because a board doesn’t feel good to you doesn’t mean that it’s not a good board for someone else. We each have our own riding style, body shape and preferences when it comes to snowboarding and it should be our goal to help our students discover these things for themselves and support them moving forward.
[divider top=”1″] Greg Nelson is the Assistant Director and Training Manager at Summit Learning Center at The Summit at Snoqualmie. He is a Snowboard Level III, Freestyle Specialist 3 and Children’s Specialist 1 instructor. Email him at gnelson[at]summiti90[dot]com
