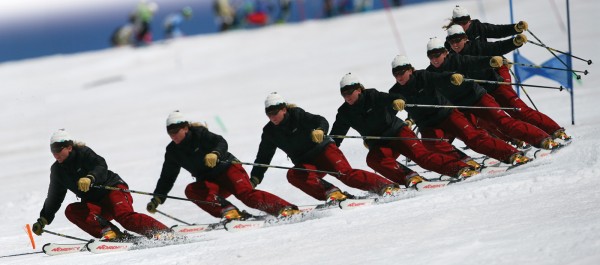
In the Winter 2009 issue of the NW Snowsports Instructor there was a featured article and a Snow Pro Tip that jumped out at me: “It’s Counter to be Square” by John May and “When it Comes to Your Pole, Get a Grip” by Kate Morrell.
The old saying goes, “The proof of the pudding is in the eating,” which loosely means that the true value or quality of a thing can only be judged when it is put to use. But first the proof, then the pudding.
In case there are any non-believers still out there, I present the following proof of May and Morrell’s concepts for your review. WARNING! Do not try this on the hill. This is only a proof.
Background
At Fall Training at Timberline in November 2009, we were introduced to a theme for the season: Stance, Alignment, Movement and Flow. In John May’s article he presented a clear description of an aligned stance and made a compelling argument as to why it would be beneficial for alpine skiers to use his concepts. In Kate Morrell’s Snow Pro Tip she presented a task and method to facilitate movement of your center of mass forward in the intended direction of travel.
You’ll often hear the catch-all answer to most ski-related questions that seek a definitive answer; “Well, it depends.” For those of you who grew up skiing with John Mohan, you’ll know exactly what I mean. So, here’s the question, “How much counter does a turn require?”
Often you’ll hear from someone who knows something about skiing that shorter radius turns need more counter and longer radius turns need less counter. The following is a graphical explanation of why counter changes with turn shape and speed, how counter relates to movement in the direction of the new turn and explains why you should put all of this information to use immediately. Like, right now!
Making Assumptions
Let’s assume that our desired outcome is flowing from turn to turn and that it is a good thing when skiing down the hill. Let’s also assume that flow means the coordinated movements of our bodies relative to our skis, with few, if any, major rebalancing or erratic movements to change direction and continue down the hill.
In the purest sense of these terms as goals, to achieve this we need to align our center of mass over our point of contact in such a way as to direct balance to the outside ski and resist all of the external forces pushing and pulling on us. In other words: We need to keep our feet between us and the snow, and not fall down.
As an aside, I use the words “over” and “under” in a frame of reference where my ski edges are always “down” and my center of mass is always “up.”
So, what does all of that have to do with “counter, square and getting a grip?” Everything. But it’s actually quite simple: you just have to be moving in the right direction. Let’s start with the picture of Kate “ripping” (see Figure 1) from her Snow Pro Tip (Winter 2009 NW Snowsports Instructor, page 13). Kate appears to be balancing over her outside ski, roughly in the middle of a turn, in the fall line and, if I know Kate, skiing fast. Let’s assume she is modeling good skiing – umm … yes, definitely! Let’s now go ahead and make some basic calculations based on a few more assumptions and determine how far to the inside her center of mass is from her outside edge in this photo.
Taking Some Measurements
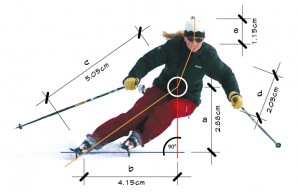
First, how tall is Kate? I could measure her, but I just asked her. She is five-feet five-inches tall or 65 inches or 165cm. Note: 1 inch = 2.54 cm. OK, let’s draw some lines (see Figure 1).
The orange line [c] extends from her Point of Contact (PC) on the snow, which is the inside edge of her outside ski, up her outside leg to a point just slightly above the center of her pelvis, which we can use as a rough estimate for her Center of Mass (CM), indicated by the white circle. Note: The center of mass is actually a single point, but by using the circle target area allows you to visually approximate the center of mass in Kate and other skiers as well. The orange line continues from her CM to her shoulders [d] then to the top of her head [e]. The blue line [b] extends horizontally from her outside ski edge under her boot to the point under her hips that aligns vertically with the point used for her center of mass [a]. These two line segments intersect at 90 degrees.

Measure the distance from her feet horizontally to the point vertically under her center of mass [b]. Now measure the combined length of the lines drawn from her feet to the top of her head [ c+d+e ], the sum of the orange lines.
In this drawing the measurements are shown in centimeters. I originally measured this drawing at twice this size, then when placed into this publication it was scaled by 50% the original size. You can measure this drawing yourself, but bear in mind that the measurements are a scale factor of the original larger version, so your measurements might be less accurate. You can use the Pythagorean Theorem from 9th grade geometry [ a2 + b2 = c2 ] to verify the lengths (Equation 1).
Get Out Your Calculator
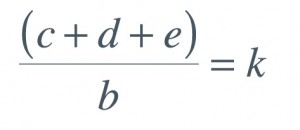
Now divide the horizontal distance her CM is from her feet (b); the length of the blue line by her total height (sum of c, d and e). The result is a 0.50 – let’s call this “k” (see Equation 2), where k represents the ratio of line b to the sum of c, d, and e. In other words: In this picture, line b is about half as long as c + d + e.
If I now multiply her real height (165cm) by 0.50 (k) I get 82.5cm or 32.5 inches. This is a reasonable estimate of how far inside her hips are from her outside ski. For you literalists out there, yes, there is some measurement error in using this picture in this fashion. Her leg is slightly flexed as are the other joints in her body. But, remember that any change in her measured height results in half of that change to how far her CM is away from her outside ski. In reality, the error may be a few inches and compared to the size of the turn, for example: a 15 meter turn (49.2 feet), a few inches is immaterial.
Now let’s figure out where she needs to direct her movements in relation to her skis to achieve the alignment shown in Figure 1. First, a few more assumptions to help visually show our answers: Assume that we always finish our turns completely across the hill or skis perpendicular to the fall line. Note this amount of turn completion is not very common as we tend to not actually bring our skis completely perpendicular to the fall line, but this is an “assumption” for making these calculations. Assume that we wish to directly move our center of mass from the inside of one turn, through the transition and into the inside of the next turn, while continuing to direct pressure to the outside ski.
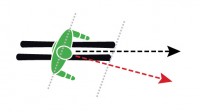
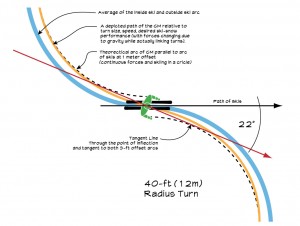
In Figure 3, from a bird’s-eye-view, the black line represents the path of our skis and the red line represents the path of our center of mass from one turn through the transition and into the next turn. The red line also represents the direction that our hips should be facing to facilitate the directed movement into the next turn. The angle between these two lines represents how much our legs must turn past our upper body to develop the counter needed for the next turn.
In Figure 4, the black line again represents the path of our skis and the orange line represents the path of our center of mass from one turn through the transition and into the next turn. The turn radius is 40’ and the offset from skis to center of mass is 32.5”. Using a computer-aided design and drawing (CADD) program, the angle from our skis that we would need to move our center of mass in the direction of the new turn to end up looking like Kate above is about 26°.
Let’s think about this for a second. In a high-speed turn Kate’s center of mass is about 32 inches inside of her outside ski. If she was “channeling” Lindsey Vonn and had her hip on the snow, she could only get maybe 39” of separation. As I mentioned earlier, in that 30’ turn, a 6-inch difference is very small and would only make an extremely small change in that angle.
So it seems the skier height has little effect on the direction the hips should be facing, the direction the center of mass needs to move at the beginning of the turn and ultimately the amount of counter needed.
Concept Applied
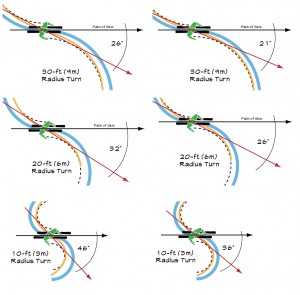
In Figure 5 the black line is again the path of our skis and the orange line is now the path of our center of mass (CM) through the turn. The right side of the graphic, with the 2-ft offset from CM to skis, represents skiing at a moderate speed and/or with less edge angle. The left side, with the 3-ft offset from CM to skis, represents faster skiing with a higher edge angle. As you can see, the slower the speed for a given radius, the less counter we need to align our hips and movements into the new turn and the larger the radius, the less counter we need to align our hips and movements into the new turn.
To calculate the change in counter for a change in radius I assume that our center of mass moves from the inside arc, through the transition and onto the inside arc of the following turn in a straight line. In geometric terms the line that the CM travels is tangent to the inside arcs and passes through the point of inflection between the two turns.
The easy way to say this is to take a ruler and draw a line from just touching one inside arc to the next while passing through the transition point of the skis between the turns. There is only one line that will fit those criteria.
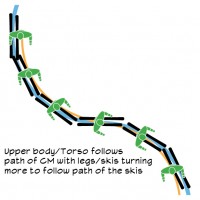
Now if you look at Figure 6 it looks like the skis take an S-shaped path between turns. Often I describe this as how your skis get from one side of your body to the other. This is how we ski into and out of a countered relationship; by turning our legs to shape the turn while our body seeks the path the CM should follow. The opposite is shown when a skier aligns to the path of the skis, then realigns to the path of the CM.
It’s Just Skiing
Does this mean that we all need to carry protractors with us on the hill and calculate every turn? NO! What this does mean is that as turn radius and speed change so does the amount of counter that is needed in our hips for us to align our movements into the next turn.
I hope that this information has helped to explain why radius and speed affect the amount of counter needed to align your center of mass over your outside foot and cleanly move from turn to turn.
Many thanks to Steve Olwin, Marty O’Connor, John May, Tyler Barnes and Rick Lyons in reviewing this article, helping me formulate the content and convey these concepts.
Be sure to let me know how the pudding is!
[connections_list id=10 template_name=’div_staff’]
